 First days with the Sound Devices 552 Mixer/Recorder
I got my 552 yesterday. First things first, let me say wow, as a first impression it’s freakin’ awesome.
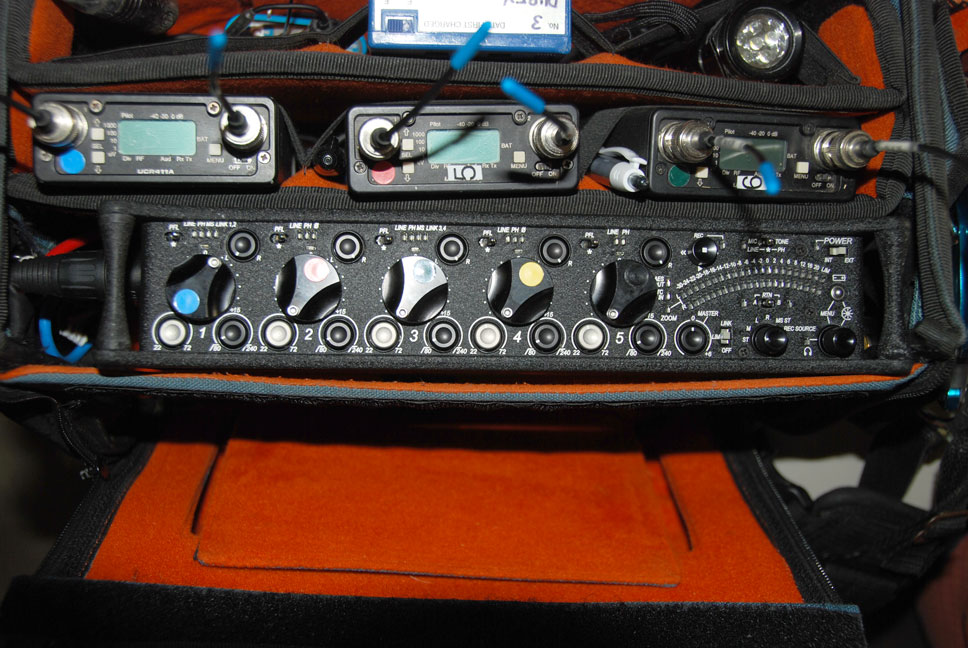
So, what is the 552? Well, take a 442 mixer, add an extra input channel, then add a 2 channel recorder with time code input, then make it way more configurable and easier to operate, add a bunch of informative LEDs, add a weird sounding talking menu system and while you’re at it, add a talk back circuit to boot… all in a package ½ lb LESS than the 442… and voila – the 552.
Here is a list of the most noticeable differences between the 442 and the new 552:
Front panel configurable
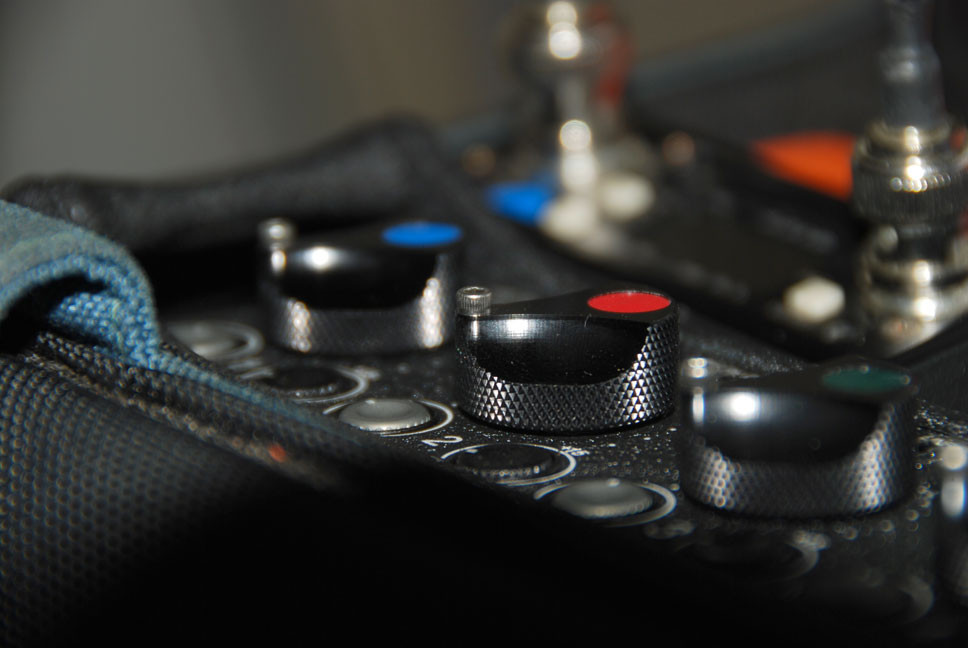
Remember all the switches on the left side of the 442? Well on the 552, they are gone. Instead, the options for mic/line levels and phantom power are all accessible on the front panel via use of the channels PFL(Pre-Fade Listen) switch in concert with the slate mic switch to toggle settings.
The Knobs & Switches
The Input Faders are now contoured differently and sport a silver knob on the tip of the fader for fingertip control. (I call it the “Suicide Stick”, because it reminds me of the old steering assist knobs on older style school buses from waaaay back in the day). I really like the feel and response of the new faders.
The Coarse Gain, L/R Pot & Low-cut Filter knobs all have the same look and feel, The only exception is that the Course gain has an additional 12db of upper end gain than the 442 had.
(22-72db on the 552 vs. 22-60db on the 442).
The Headphone Volume knob is now a digital knob with a built in button. Not only does it control the headphones volume, but it also controls MUCH more. When the Headphone knob is rotated, The VU meter reflects the level of the volume.
The volume controller also controls secondary functions such as the menu, LED brightness and return level control, depending on the button or switch being held down, then using the volume control to adjust setting and make selections with it’s push button. Simply pushing the volume button engages the zoom function on the VU meter (which is a mode where it shows you 0 to 20 on the mixer only, but spread over the whole VU).
The PFLs operate differently from the 442. Rather than the “press and hold” switches on the 442, when you slide the switch and let go of the PFL, the channel is soloed until you slide it over again.
The Slate Mic/Tone switch is slightly changed too. When you quickly slide the slate mic switch and release it, it solos the slate until you slide it again. If you press and hold the slate switch for more than a moment, it releases the slate mic when you release the switch. The tone switch no longer latches. Instead, it acts like a press and hold button, but when you hold it on for two seconds it stays in tone mode until you flip the switch again to release it. The slate mic level is adjusted by holding the slate mic and turning the headphone volume knob. A visual level shows on the VU meter the volume change. (This may SOUND complicated, but it’s very intuitive once you do it for the first time!)
The Return switch for A & B returns now have LED lights showing if they are active in the headphones. You can adjust the levels for the headphones by holding the switch for the return on and adjusting the headphone knob to raise or lower the levels. A visual level shows on the VU meter the volume change.
SVEN (Synthetic Voice Enhanced Navigation)
SVEN is a voice driven menu system that talks to you through your
headphones. Frankly, he is a little hard to understand at first, but
as you become more familiar with”him” it starts to get easier to
understand him.
SVEN announces individual menu choices and options, record/play
status, time of day and recording time remaining on the card.
The first person who figures out how to hack the 552 to get SVEN to
sound more like a HELEN will get some serious kudos from fellow sound
mixers. 😉
Built-in Recorder
The 552 incorporates a high quality two channel WAV/MP3 Recorder. It records in 16 or 24 bit and up to 96Khz WAV files.
It accepts incoming timecode, but does not generate it’s own. Timecode needs to be fed into the mixer via a TA3 connector on the right side to sync the device with a camera/s. This could be done a number of ways, such as hardwiring, or the use of a lock-it box in the bag with the 552, or even running a wireless transmitter on the camera sending timecode out to a receiver in the bag to the 552.
The 552 automatically changes it’s timecode settings to reflect the type of incoming timecode.
The file saving work flow saves each day of recording in a daily folder (Year, Month,Day, 09Y10M15) and records filenames in order of recording (Y,M,D, # – 09Y10M15-001.WAV). It also has a max recording size of 2gb and automatically splits to the next file when it reaches the limit.
Pressing and holding the Battery Check button enables SVEN to tell you how much recording time remains on the card.
You have to remove the card and mount it in either a Windows or Mac system to transfer the files. The USB connector that is next to the card is for factory use only and does not allow you to use it to transfer data.
Another nice feature of the recorder is the ability to playback files to headphone AND/OR to your source mix or IFB. To enable Output/IFB playback, hold down the Battery Button and press the play button.
There is a small chance of bumping the record toggle button, but I don’t think it’s that much of a problem, but a record switch lock might be a nice future addition.
The Menu
Getting into the control menu is much easier and can be done without having to turn on and off the device. In fact, it can be operated while actively mixing without interrupting the program! To access the menu, hold down the Battery Check Button and click the Headphone button. SVEN guides you through the setup of each function. He takes a little getting used too. Use the volume control to guide yourself through the menu items and use the volume push button to choose your selection. To exit the menu and accept your changes, simply push the battery check button.
Menu items are quite diverse and there are many more configuration options than with the 442.
Talkback Function
When the talkback function is selected in the menu, the 1/8” headphone jack is split off (from the 1/4”)
so that the slate mic appears in the right monitor of the boom operator’s headphones for discreet communication from to the mixer. In this mode, the slate mic does not go to program mix. There are various options for what gets routed to the boom op.
As of yet, I’m not sure if it can be configured to allow for a talkback from the boom op.
New LEDs
There are a lot more LEDs on the 552 than the 442. Whereas the 442 had Level , Headphone, Peak, Limiter and Power LEDs, the 552 has many more informative LEDs than it’s predecessor. Each pot has it’s own channel specific LEDs that show the status of the channels phantom power and line/mic status. Some channels have other LEDs for Phase, MS, and Channel Linking.
There is another LED directly above each pot that I particularly like: the Input Signal LED. Where as the 442 had a Peak & Limiter LED, the 552 now has a single LED the changes colors and brightness depending on the level pushing through the channel (green, yellow, red). It also changes to an off-yellow when the PFL is activated on channel to show that it is being soloed.
LED Brightness is controlled by holding the battery check button and turning the headphones knob left (-) or right (+). There are MANY more levels of brightness steps than the 442 five steps.
Other LEDs:
-The Record LED changes colors to reflect current recording/playing status. It blinks yellow if no SD/SDHC card is in the slot or if the card is in, but remains unformatted.
-The Zoom LED lights up when it is engaged.
-There is also a LED on the front that lets you know if timecode is actively being fed to the 552.
-Just like the 442, the Headphones LED will glow read when the headphone amp starts to overload.
Other noticeable differences:
-Supports AES Digital outputs.
-Return Loop back ability (Takes the A&B return and sums them and outputs to Tape Out and Mono Mic out)
-Split ear Return Monitoring (Listen to A Summed Returned in left and B Summed Return in your right ear)
-Left Tone Oscillator function (to check to make sure your left and right channels are properly set on cameras)
-Time of Day Date/Clock
What’s Missing?
Not much really.
One thing missing from the 552 vs the 442 is the option for T power mics. All you 416T users are going to have to upgrade or get a Phantom to T power converter.
I also wish the 552 had a built-in time code generator. Maybe the 552T is in the future? We can only hope!
In Conclusion:
I really love my 552. It is an huge step forward in field mixing.
May the 442 rest sweetly in heaven… and the X5 burn baby burn! Long live the 552!
(I will say that I used to have a Wendt X5 and it served me well for many years, even though I had many particular issues with it (limiters, channel bleed, etc.) )
More information can be found on the Sound Devices website at:
http://sounddevices.com/products/552.htm
-
Sound Devices 552 Top View
-

-

-
Very informative, thank you!
As I recently just purchased the 552 and have been loving it this far, I have been wanting to take full advantage of the built in recorder but want to do so wirelessly. As I read in your post you said it would be possible to send timecode wirelessly from the camera to the mixer. Could you break this down as to how I would go about doing this??
Thanks so much!
Mike, the way to send timecode from a camera to your 552 is by using two Ambient Tranceivers (one attached to the camera set to send and the other on your 552 set to receive). Alternatively use a Sennheiser G3 radiomic system with the appropriate wires 🙂
I learned more in the last 15 min’s about a mixer you are awesome
I learned more in the last 15 min’s with such an amazing mixer,thank you so much!
I learned more in 15 min’s about this machine that all there paperwork
also a recently purchased 552 for classic recordings.those mic amp are so very clean….
and sound like I am in front of the real
musians…never heard a think like this.
they sound much better than the t744 I had before..
love the 552
Interesting read! Thank you for the informative post. Nice share!
Decades later and the SOUND DEVICES 552 is still super clean and kicking ass! I wish they made firmware updates that allows users to plug it to the computer (I mean it does have a plug in the back) so you can edit directly from the unit.
Sound Device seems to just move on past it’s older products and don’t really offer support, but the thing is a dinosaur that is so far ahead of it’s time, that in the future, it’s still relevant.